Monday, October 29, 2012

Pink Velvet Cookies

We had a ward baby shower for a baby girl, and the them was "If you give a mouse a cookie." It was adorable! I planned to bring pink velvet cookies- deliciously moist, light pink cookies with sweetened cream cheese swirled throughout. What I actually brought were slightly dry, dark red cake cookies with tart cream cheese....altogether not my best attempt. However, they did grow on me in the three days before they were gone completely. I was disappointed that I didn't gorgeous "baby girl" cookies, but they were pretty good, and I know I could do even better next time!

Here's the problem. Pink velvet...it doesn't exist. Red velvet is a chocolate cake, which means pink never stood a chance. I did some research once I realized I couldn't have velvet and pink, and I found that what anyone calls "pink velvet" is any variety of vanilla, very light chocolate, strawberry, etc. etc. cake. If it's pink, you can apparently just add the word 'velvet' and you're set!

These are totally pink! ...right? :)

My original idea stemmed from these cookies from Taste and Tell, which look like moistest cookies ever. But they call for a red velvet cake mix, which meant going to the store...which meant no. I also loved the cream cheese swirled in the batter in these cookies from Amybites. But these didn't have any buttermilk or vinegar, which is the definition of red velvet to me! So I ended up with these red velvet crinkle cookies from Not a Chef, but I can Cook.

The recipe I followed- with cream cheese in the middle.

I added pink food coloring instead of red, but it definitely looks red anyway. They're certainly not as red as if you use the full bottle or whatever it calls for, but I thought it was plenty fine. I made the first two cookies exactly like the recipe, with a dollop of cream cheese right in the middle. I tasted one after it baked, and all I got was a large amount of red cookie, followed by a large bite of bitter cream cheese, followed by more dry cookie. So I improvised and swirled the cream cheese into the batter like the other recipe I wanted to make. It made them much better! Little bits of cream cheese taste way better than one large dollop.

Swirling in the cream cheese. I really should have added more!


Like I said, these cookies definitely grew on me. However, I would still like to make them more moist next time somehow...I'll need to do some research. The only problem left is that I really really really really want to make this red velvet cake from Simply Scratch. It looks as moist as they come.

Oh. my. I need to make this!


Saturday, October 27, 2012

Blue and Yellow Skirts

I know I'm taking a break from sewing (and I'm just starting to miss it, so that's a good thing!), but these two skirts are from a few months/weeks ago. The blue skirt was back in April, and the Yellow skirt I just finished  in September. My inspiration for these skirts came from this tutorial by The Winthrop Chronicles. One of my biggest downfalls when it comes to sewing is picking the right fabric. I can never seem to get the right...texture of what I want. I think that's a major thing I want to focus on and research when I eventually sew something again.

But anyway, I do quite like these skirts, beside the fact that the fabric is a weird texture and so they wrinkle easily, and they stick to themselves and me in weird places..basically I need to line the skirts I make, but I just haven't gotten around to it. Since I really wanted a yellow skirt like the one in the tutorial, I made the blue one first as a practice and then learned from it in order to make the yellow skirt. The blue one has places where I had to take it in afterward, and fold over fabric, etc. etc. But when I put them back on to photograph them, I actually like the blue one better. I think all the folded fabric makes it thicker and heavier, which feels so much better than the yellow one- it's too light and doesn't feel like it covers me as well (don't worry, it does cover me plenty :D).

side by side- the yellow isn't really that bright..promise!


I learned a few things, and I want to learn way more before I ever tackle a form-fitting skirt without a pattern again. I learned that since I'm curvy, this kind of skirt doesn't look as good on me..I think. I may just be picky, but I feel like I look better in skirts that sit higher on my actual waist, than low on my hips. Hurray for pencil skirts! I also learned that I don't know how to make pockets, or sew a zipper (especially invisible ones), or measure myself well.
pleats on the front of the yellow skirt

the blue one has pockets! I couldn't get pockets to work on the yellow, so I sewed them up.

Isn't this zipper invisible? Okay..so I need to work on that skill a lot.

That was a major part of the second skirt- I wanted to measure myself perfectly so I would have a form-fitting skirt without folded-over fabric and such. But I need so much more work on this skill, because I still can't figure out how to get it to sit on my waist rather than ride up all the time, or how to get the length right for standing versus sitting. Skirts are just so complicated! But I do like these, and if I only wear them a few more times before trashing them, at least I'm on my way to learning valuable skills!


Tuesday, October 23, 2012

Donuts for Conference

I feel like everyone has a food tradition for General Conference. And they all seem to be breakfast related as well. For us growing up, it was always cinnamon rolls. In my memories (which may be slightly exaggerated :D), my mother would spend all morning making the dough, rolling them out, and in the end we'd have hundreds of cinnamon and orange rolls. Okay, more like two cookie pans worth (probably 24 rolls total), but they're so decadent that you really can only have one, so it seemed like hundreds. My very favorite part was that my mother cut the rolls using sewing thread. She would make marks in the rolled-up dough so the rolls would be the same width, then she'd wiggle the thread underneath a roll, bring the sides up together and cross the thread, pulling to slice off a roll. It slightly reminds me of the time I lost my two front teeth in a similar fashion..but we'll not go into that.

I made cinnamon rolls each conference while I was in college- made them for my roommates, for myself, really for anyone. Each time I used a different recipe in my attempt to recreate the rolls without ending up with hundreds for myself. However, they definitely never matched up to my mother's rolls.

This conference, with unpleasant memories of last conference (I'm pretty sure I woke up at 5am to start the dough for the recipe I chose...they were amazing, but still...5am??), I resolved to figure out what we wanted for our own tradition. My husband loves donuts, and we almost never buy them, and I also don't fry things very often (certainly not dessert foods). So, donuts it was!
I began with at least four kinds of donuts in mind. I have a Pinterest donut board, and eventually I'd like to try them all! However, we settled on copycat Krispy Kreme donuts from Hot and Cold Cravings and baked apple pie donuts from Your Cup of Cake. We did a trial run of the glazed donuts earlier in the week to make sure it was worth frying up a whole batch of donuts. It definitely was!

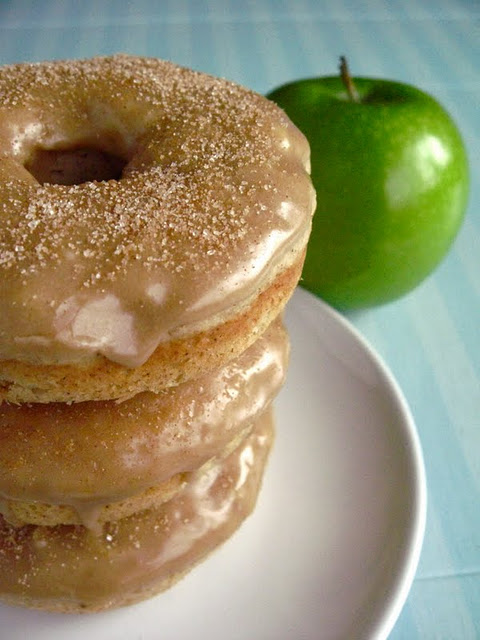
Maple apple donuts- they look so gorgeous

Glazed donuts- these look just like Krispy Kremes!

First, the apple pie donuts. Baked donuts. are not. the same. at all. I just need to get over it and start expecting more of a 'muffin' than a 'donut.' I actually loved the donuts- they were very moist with the yogurt and the shredded apple. However, the maple glaze took a while to grow on me. As you can tell, I didn't put that much glaze on- because it was incredibly sweet and overpowered the light, apple-y donut/muffin. However, as the glaze sank into the donuts, they became even more moist and I began to really enjoy the glaze too! I probably won't make these again, but I'm glad I did get to try them.

The fried donuts. These are so good! I highly recommend this recipe to anyone wanting a donut similar to Krispy Kreme. Although not identical, they were surprisingly close. When we did the practice run, I learned quite a few things: 1. they needed to be glazed on both sides (submerged in glaze) rather than just drizzled. 2. I let them raise overnight in the fridge the second time, and they were much lighter, instead of too dense and bready. 3. I cut them in smaller circles the second time- they get much bigger during the frying process. I wasn't expecting how many donuts the recipe made the second time (I made a half batch for the practice), and so I'm glad these were good enough to eat for leftovers! I really just can't say how great these are. I dipped a few in the maple glaze from the apple donuts, and made a chocolate glaze from Something Swanky as well.


I am glad I only made two kinds instead of four, and I'm pretty sure the glazed donuts will become a tradition each conference weekend! However, I'm excited to try all my other donut recipes as a 'second' recipe each time, and I will try to expect muffins rather than donuts. :)


 Overall it made almost 30 donuts, plus donut holes. They're pretty ugly, but delicious!

I did learn one more thing I want to remind myself of next time. After I cut out the donuts, they have to raise again (let them raise at least another hour, rather than a half hour like the recipe says). I just put the donuts on parchment paper, but they stuck terribly after they had risen. Remember to spray the parchment or pan while they're resting, so they stay in pretty circles and don't turn into crazy donuts! I definitely can't wait for next General Conference. I love this special weekend for so many reasons, and now I have another reason to love it as well.

Wednesday, October 17, 2012

Fall Decor

Since I have officially given up on sewing (or at least taking a break for a few months), I've turned to other craftiness lately. I was absolutely determined to decorate for fall this year, and I'm hoping to decorate once winter and Christmas show up too. I have a few more ideas in my mind that I haven't started yet for fall, but at least I got two things done: a fall wreath, and a burlap banner. I may not get around to anything else, but I can pick up next year with two pieces already in my collection.

The wreath has been on my thoughts for a while. I finally bucked up and printed all my coupons one weekend, went to three different stores, and bought plenty of supplies! I haven't owned a glue gun until now, so that was definitely stopping my craftiness. In total, for all of the supplies to make the wreath and the banner, I spent less than $20. I still have burlap and leaves leftover to make something later if I want too!

The wreath is just a green wreath form with brown yarn wrapped around. I was inspired by many yarn wreaths, but particularly this wreath from Six Sisters because the yarn didn't have to be perfectly placed- they just covered the wreath form multiple times. The wrapping took me about 45 minutes for one wrap, and another 15 for the second wrap- about an hour. I then used this tutorial from Take Heart for the flowers, which were way easier than I ever could have imagined! They were probably done in a half hour total, making the whole project under 2 hours. I am in love with this wreath and I want to make a variation for each season!


The burlap banner was definitely not on my thoughts for a while. I just bought burlap on a whim, and the leaves were nice and fall-ish so I got them too. This is one of those projects that just came together without any mishaps- hurray! I cut a triangle out of paper as a template, then cut my burlap triangles. I was just going to freehand the lettering because I didn't want it to look perfect, but I soon learned painting on burlap with a foam brush is just a little tricky. Instead, I took the extra time to print the letters out and cut each one into a template. With those templates, the painting of the letters was super fast and I love how it turned out.


For the leaves, I just stuck them to the burlap with my new amazing glue gun. I hope they'll stay glued over the years, but it'll be a simple fix if they come off. To finish it all off, I glued the triangles to a piece of string to keep them all together, then I sewed one straight line at the top of the banner so everything will stay put. The finished banner is over 10 feet long, so I'm not in love with the fact that I have to make it loop rather than hanging it in one big swoop across the wall. However, someday we'll have a longer wall and I can hang up my burlap banner each fall!
 
The full banner. It makes me so happy every time I see it!

What did I learn? I love crafting. These two projects made me feel better about my creativity skills, since lately the sewing has been making me depressed. I also learned to go slow and make each step as perfect as I can, so that the whole finished project looks good. I'll always be glad I didn't freehand those letters!

Monday, October 8, 2012

Shower Treats

I just realized I have no pictures of the actual baked treats for this post. They were so yummy that I didn't get a picture before they disappeared! Either that or I was in too much of a hurry because I was smart and decided to make two desserts the morning of a party that took an hour to drive to....yup, that one. For my sister's baby shower, I was asked to bring dessert and I had a lot of fun planning what to bring.

First of all, let me start off by saying I originally planned to make at least three types of dessert, and probably twice as much of each as I ended up making. Thankfully, my family members calmed me down and they were definitely right- two desserts was plenty.

I made chocolate chip cookie bars and raspberry individual cheesecakes. The cookie bars are in honor of my pregnant sister because I have so many memories of her making cookie dough and keeping it in the fridge to eat all day long. I used her famous cookie recipe- it is essentially double what any normal cookie recipe would be. It fit an 11x17 cookie sheet perfectly! The cookie bars were so thick compared to my previous attempt (which was really really really bad). My husband asked why I don't make them every day!


The other dessert was individual raspberry cheesecakes from Annie's Eats. I've made this recipe before, and I loved it just as much this time. I wasn't going to do real raspberries, because they tend to be expensive. However, the other option of using canned pie filing, was just as expensive! So I opted for real berries and I had plenty left over to eat and make some raspberry jam-type stuff (no pectin, but still good!)


So what did I learn this time? Using the full ingredients truly paid off. I won't usually make a cookie recipe that big, but I know when I need one, this'll be a great one to use! I'm not sure if I learned anything else, but it's good to have a pleasant dessert memory to fall back on when I have a future recipe disaster. Hopefully I can keep being happy with my desserts!

Monday, October 1, 2012

Domestic To Do's

This is an extremely boring post....but I need to get all my thoughts and to-do's out there. Sorry, more interesting things coming soon!

I can be honest with myself and admit I'm not skilled at decorating. I have such a hard time thinking of buying random knick knacks to store around my house to make it look "put together." However, I really want to learn about design, about putting a room together, about color coordinating and especially about how to incorporate what I love (clean, open spaces with few unnecessary decorations) into spaces that actually look good.

I have always put off decorating our current apartment since I was in school. But now that I work, I have time in the evenings and I have a little more money. :) I'm not really in the mood for sewing clothes anymore (shh..don't tell the unfinished skirt in my closet...) but since I still have a crafting resolution this year, I figure I should spend the rest of the year crafting up the house! So, before December 31st, here are my crafting to do's:

1. The bathroom
Clearly this isn't the most seen room in the house, but it feels the most bland to me. All we have are grey towels, a black/white striped shower curtain, and a grey rug. It needs color!! I want to do a picture display on the wall and also some flowers or something on top of the toilet. Here are some inspirations. Does it look cohesive at all?

Color Scheme

Homemade artwork in blue color scheme (source)

I really like this vase- what could go in it? (source)


2. The bedroom
Our bedroom looks truly sad. We currently have a bed (no headboard), a dresser, and...curtains? No nightstands, nothing at all on the walls...pathetic. I plan to buy these nightstands at ikea to match our dresser. The curtains have a blue stripe in them, so it'll probably be the same blue/grey/black as the rest of our house. Here are some ideas:

Color Scheme

I bought these lamps and love them!

These nightstands are on our list once they're in stock!

Unfortunately, bedroom artwork is where I'm at an extreme loss right now, so I'll keep hunting! Maybe I could do another painting, or a watercolor? We'll see what's in the budget. :) For now I'll just be happy when we have some nightstands to put our lamps on!

3. The kitchen/living room
This room is actually decorated pretty well- or at least better than the rest of the house. I did the artwork on one wall, and we got our wedding pictures up on the other wall. However, there are still a few things I'd like to have done before the end of the year:
-Picture above the kitchen sink. My current life motto is "Live Sweetly". I'd love to have some subway art or other art displaying that phrase in my kitchen.
-Decor for above the cabinets. This space is daunting to me. I don't just want random things up there that mean nothing and that I have to dust all the time. The space is fairly small, but it's long so I'd need quite a bit up there to make it look good. Plus the only idea that ever comes to mind is fake plant garlands, which I know I couldn't stand. So it just stays there, as a big blank focal point.
-Couch pillows. This last one is super small, so hopefully I can get it done. I would just like some matching pillows to make the room look more comfortable. Maybe eventually I'll change them out for seasons, but right now I'd just like anything! Also for small things, I'd like some flowers in vases or other decor around the house (not too many knick knacks :D) but something to make it look comfortable.
-And eventually I'd like to recover our kitchen chairs, but that's at the very bottom of the list since they're plenty fine as they are.

Here's the color scheme and some ideas:


Fhew. I think that's it. It's only three rooms, but there is quite a bit to keep me busy this fall and winter. I can't wait to get started now that all my ideas are finally listed out!