Friday, February 24, 2012

Dessert of the Week: Cinnamon Rolls

Since Monday was President's Day and I would be home all day, I decided an excellent breakfast was in order! I have been researching cinnamon rolls for a few weeks, and I have no idea why. But finally, one of my favorite blogs, Lauren's Latest, developed her own Cinnabon copycat recipe!

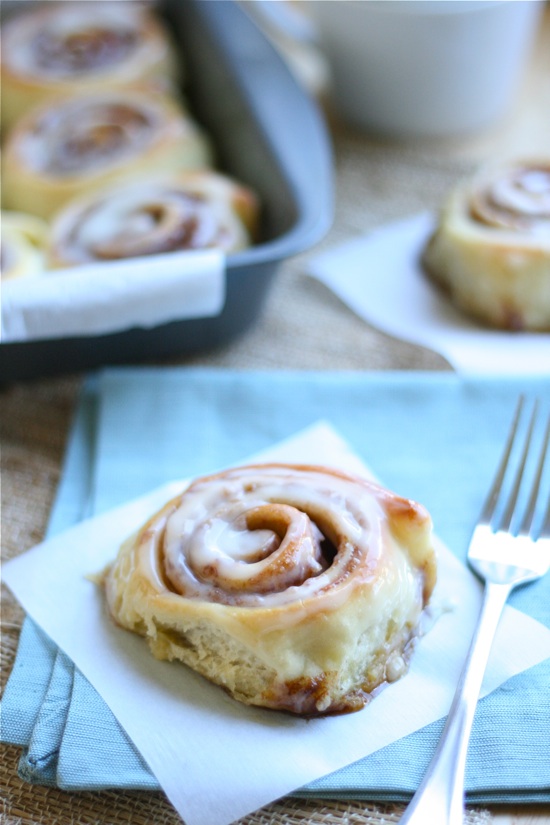
(Delicious picture from Lauren's Latest)

I began the morning at 6am making the dough. Then I let it raise for two hours (in the oven with a hot bowl of water because our apartment is sooo cold) while I pretended to go back to sleep, but really did homework. Then I rolled out the dough and spread the delicious brown sugar mixture over the whole thing, getting my hands all ooey-gooey! Her instructions say to spread the dough to a 20x30 rectangle. Do you know how big that is? HUGE. It was as big as my entire kitchen counter! I didn't quite make it that big, but I did get to about 20x26 or so. Pretty good, eh? 

This dough was AMAZING to work with. I don't have a stand mixer, but my hand mixer with its included dough hooks sure worked hard to get this dough perfect. Seriously, I can't get over how amazing this dough was. It was stretchy and smooth and it rolled out perfectly. It didn't stick to my counter or anything!

I let the rolls rise again for a few hours- not quite as long as they needed. But we were hungry! They baked up just right in 17 minutes in the oven, and they actually spread out more in the oven as well. The original recipe said it would only make 15, but I got 20 out of the recipe, and fit it all in a cookie sheet pan. I did put parchment down- and it worked great!


The frosting was to die for. She recommends spreading half of it right onto the hot rolls straight out of the oven. It melts into everything and makes it so gooey. Then the rest of the frosting is spread onto slightly cooler rolls, to stay on top. I loved this frosting! It was cream cheese- which I usually find too strong. BUT I think she found my secret ingredient for me. Lemon juice! Just a bit of lemon juice cuts through the sweetness of the cream cheese and makes it light.


These were amazing. Not too bready, not too dry, not too frostingy (wait, is that even possible?)

Overall, PERFECT. I will make these again- probably let them raise overnight though. The only downside was they did take 5 hours from start to finish- so these are for sure a rare treat, not a usual thing!


Tuesday, February 21, 2012

February Project Craft: Reverse Applique T-Shirt

February's craft project was a late starter, but it sure was fast once I got on a roll! I have a whole bunch of plain t-shirts that are getting near the end of their lives. Ever since I saw this tutorial from Sweet Verbena for a reverse applique bag, I knew I wanted to do a reverse applique t-shirt. The hardest part was coming up with a design- But now that I've seen the results, I have many more designs in my head I want to try!

I wanted to do this purple t-shirt, so I looked for some flowery fabric. I was going for "spring wildflowers," but I couldn't find anything at Jo-Ann's that worked, so I settled for this purple fabric. It looks okay, but it's not my favorite.


I wanted to continue my "spring wildflowers" theme with a whimsical flower design. I couldn't find anything online I liked, so I just penciled something out. I figured, this is just a project to keep me creative and help me learn skills so it doesn't need to look good. :)

This isn't really a tutorial but I took pictures all along the way for fun. I ironed the interfacing onto the fabric- it took me back to my childhood when I remember making Halloween pumpkin pillows with my mother. I still remember ironing on the interfacing to that orange fabric!


Then I just sewed. Now, I was really afraid of sewing on the jersey fabric of my shirt. I tried a few times on a spare t-shirt I had, and it was not pretty when I just sewed straight on the t-shirt. However, when I sewed on the interfacing and the purple fabric as well, the stitches actually stayed in place and didn't stretch the shirt! In a few months I have a monthly sewing project of making a jersey dress. I know before then I will definitely need to buy a ball point needle and some elastic thread. Maybe even a walking foot! But I was relieved to find I could sew on this shirt without too much trouble. Fhew!


The hardest part was the cutting. First of all, thank you parents for amazing sharp scissors for Christmas! However...due to me wanting to finish this shirt and have it done, those sharp scissors did find their way through my purple shirt a few times...There are just a few little holes here and there now, but hopefully they won't be too noticeable with all the pretty flowers!


Overall, I am SUPER happy with this. This is the first time I have dreamed up something and have it actually turn out how I wanted- and I actually think it looks cute enough to wear sometimes! The fabric match isn't my favorite though, so I'll for sure be trying this with other shirts- maybe some bold reverse applique stripes, maybe some letters on a purse or something. I am so excited to have learned a new skill!


By the way. When I went to Jo-Ann's to get this fabric, I was wandering around and fell in love with this fabric. I bought all the rest they had! But now, I have no idea what to do with it. What would you do with it?

Wednesday, February 15, 2012

Valentine's Dinner

We had a lovely dinner last night! Or rather, the dinner I planned was wonderful! The execution...was a little sloppy. We were having all of our favorite things: steak, mashed potatoes, green bean casserole, and chocolate lava cake with ice cream!

I used top sirloin for the steak, and attempted a pan searing, then oven finishing technique. I think my pan was not quite hot enough (plus I don't have a nice heavy cast iron pan), so the crust was not quite as crisp as it should have been. But man, is that steak pink or what! That is the pinkest I have ever left any meat- and it was an internal struggle, let me tell you. But I resisted the urge to cook it in the oven for another 15 minutes (just kidding- it would have been charcoal if I did it that long!). It was probably in the pan for 3 minutes per side, then about 5 minutes in the oven.

(Our pink and juicy steak)

(Looks so good! From The Hungry Mouse)

We also had Pioneer Woman's smashed potatoes. I love these! The onion toppers and green onions make them so delicious. I didn't add bacon- but next time I will for sure. And of course, we had our favorite green bean casserole. It's always such a hit!

(Pioneer Woman's scrumptious smashed potatoes)

Dessert was molten lava cake. I made a half batch of this recipe from Savory Sweet Life. It was the easiest recipe I could find- plus it used chocolate chips instead of chocolate squares! However, I did it in a cupcake pan and so I overcooked them a little. I think I cooked them about 9 minutes, and rather than being molten in the middle, they were spongy with just a little lava. Have you ever had the 5 minute microwave mug cake? It tasted like that!
(Our molten cupcakes and vanilla ice cream)


(Tasty picture from Savory Sweet Life)

Overall, such a great Valentine's Day! I love cooking and not waiting in line at restaurants, so it was just the best! Hope you all had a great day as well.

P.S. Raise your hand if you knew how expensive ham is. Yah, I didn't, and so I was shocked in the grocery store last week when I needed to buy some for the two meals I had planned with ham! We aren't huge ham fans at our house anyway, so I found some turkey ham next to the ham! There was even a Jenny-O brand, so I figured this must not only be legitimate, it must be healthier too! We're having it in dinner tonight (this recipe, it's an experiment!) so we'll see how it tastes in comparison!

But doesn't it look so strange?


Wednesday, February 8, 2012

Dessert of the Week: Double Brownies

We had a wonderful family party this weekend, and I got to do treats! Making dessert for 16 people, however, was something I haven't tried before. I looked up fun recipes all week, and finally decided on doing two kinds of brownies: red velvet cheesecake brownies (we love red velvet in my family) and rocky road brownies (my dad cannot come to Utah without getting BYU creamery rocky road ice cream at least once!). I started by laying out all the ingredients on my counter because I wanted to document just how huge this task was going to be.

I definitely got out some things without realizing they were not in the recipes: baking soda, brown sugar, marshmallows (in case the fluff didn't work out!), chocolate chips (what? I didn't use those? that's a first). But it was still so much! 3 cubes of butter, shortening, 9 eggs, almost half my cocoa, I even got to open my apple cider vinegar for this (why do I have that and haven't used it? Who knows...)

The two recipes I chose were Red Velvet Brownies from Freutcake and Rocky Road Brownies from The Royal Cook. That recipe calls for box mix brownies, but I wanted to try brownies from scratch, so I also used Trisha Yearwood's Brownies from Heidi Bakes.
(Red Velvet Brownies from Freutcake)
(Rocky Road Brownies from The Royal Cook)
(Trisha Yearwood's Brownies from Heidi Bakes)

Overall, I was SO happy with how everything turned out. I doubled both recipes, and made a 9x13 of each kind of brownie. There were only a few mishaps: the red velvet brownies recipe called for 8 ounces of cream cheese, so doubling it would use 16 ounces (2 boxes of cream cheese). However, we almost never have cream cheese, and so what I had was a half box, or 4 ounces. The brownies were fine, but everyone preferred the rocky road ones and I think it was because the red ones were a bit dry without the extra cream cheese topping. 

My other mishap also contributed to dry red velvet brownies. I LOVE when recipes describe the process and the texture/consistency of how it should all look. Not being a chemist or a very experienced cook, I rarely know when a recipe is "right"- like how much baking powder will make something rise, or how sticky or smooth a dough should be. When I put together the Trisha Yearwood's brownies, the dough was almost more like fudge: I had a hard time spreading it into the pan. These brownies baked in only 30 minutes and were very dense and fudgy. The red velvet brownie batter was almost completely liquid and it probably needed more flour or something, but I had no idea. They took 45 minutes to bake and were crumbly, more dry, and more cake-like rather than brownie-like. 

Brownies in the pan. This was probably the first time ever I haven't snuck a taste before serving dessert! 

The Trisha Yearwood brownies were my favorite brownies I have ever had, and I will be using this recipe for ever! The rocky road addition to the brownies was perfect- chocolatey and moist, with gooey marshmallow fluff and pecans. I will also definitely try out the red velvet brownies in the future and try to make them just as dense and delicious. And add more cream cheese of course! Overall, it was such a delicious weekend and so fun to cook for so many people!

Really bad photography. But we were too busy serving and eating to worry about pretty pictures!


Sunday, February 5, 2012

Update on Project Craft: February

It was certainly a lot harder to pick a craft project for February than it was for January. Mostly because it is so cold I never want to go out shopping for supplies! So I am trying to use some of the fabric I have laying around to see what I can come up with. A while ago I stumbled across this reverse applique bag  from Flamingo Toes and I have decided to see if I can do it in t-shirt form for February!


I found a few tshirt tutorials like this one from Sweet Verbena (I love almost everything she does!) so I think I can manage it...hopefully.... Here's the game plan: This week- plan design for tshirt and buy fusible interfacting (Come on JoAnns, I need a good coupon this week!). Next week will be sewing the shirt, maybe a few if I actually like the way it turns out.

Anyway, thankfully I didn't waste my Saturday yesterday, even though I didn't have a craft project to start yet. I learned how to do invisible hems on my new machine! It's digital and I am always afraid I am going to break it for some reason (oh...it could be that I did break a needle the very first time I sewed on it! Yah...I am very careful now about threading it exactly the right away- oh, and not sewing on super heavy fabric!) But yesterday I ventured out and put on the "R" foot for sewing blind hems. The first few stitches I just cranked the hand wheel because I was so afraid the needle would hit right in the middle of the foot where the guiding line is. But it all went well, and I now have some khakis that aren't too long for work!

I actually like that you can still see a line. They look hemmed, but not just sewn straight across. I think the line will disappear with washing too.

Look at the little tiny stitches!

Is it weird that I think this picture is actually really pretty? You rock little pink camera! I just love that you can see the detail of the fabric, and then the stitches are adorable! It grabbed just the tiniest bit of the actual fabric for the hem. I love it!


Wednesday, February 1, 2012

Dessert of the Week: Blondies

We had a wonderful dinner at my sister's house over the weekend. I was in charge of dessert- and I wanted to make blondies! Because we always have brownies, and blondies just sound fun. Little did I know these babies pack quite a bit of sugar and butter inside. I didn't want to use more than two cubes of butter (I'm healthy, can't you tell? :D) so a lot of the blondies recipes I found on Pinterest wouldn't cut it. But these Infinitely-Adaptable Blondies from Smitten Kitchen were perfect!

(Picture from Smitten Kitchen.)

I doubled the recipe, and rather than put it in a 9x13 pan (again- two cubes of butter for just a 9x13! Man, that seems like a lot). So I did a full cookie sheet worth and they were a bit thin, but still delicious and chewy. I think maybe a jelly roll pan would have been perfect. I mixed in white chocolate chips, semi-sweet chocolate chips, and toffee bits. With vanilla ice cream, these were sure winners!

(My lovely picture with awkwardly strewn chocolate chips. 
They look kind of dry here, but they were good I promise!)


Blondies

From Smitten Kitchen, adapted from How to Cook Everything
8 tablespoons (1 stick, 4 ounces or 113 grams) butter, melted
1 cup (218 grams or 7 3/4 ounces for light; 238 grams or 8 3/8 ounces for dark) brown sugar
1 large egg
1 teaspoon vanilla or 1/2 teaspoon almond extract
Pinch salt
1 cup (4 3/8 ounces or 125 grams) all-purpose flour
  1. Butter an 8×8 pan
  2. Mix melted butter with brown sugar – beat until smooth. Beat in egg and then vanilla.
  3. Add salt, stir in flour. Mix in any additions (below).
  4. Pour into prepared pan. Bake at 350°F 20-25 minutes, or until set in the middle. I always err on the side of caution with baking times — nobody ever complained about a gooey-middled cookie. Cool on rack before cutting them.
Further additions, use one or a combination of:
  • 1/2 to 1 cup chopped nuts, toasting them first for even better flavor
  • 1/2 to 1 cup chocolate chips
  • 1/2 teaspoon mint extract in addition to or in place of the vanilla
  • 1/2 cup mashed bananas
  • 1/4 cup bourbon, scotch or other whiskey; increase the flour by one tablespoon
  • 2 tablespoons of espresso powder with the vanilla
  • Stir 1/2 cup dried fruit, especially dried cherries, into the prepared batter
  • Top with a vanilla butter cream or chocolate peanut butter cream frosting