Tuesday, August 13, 2013

Blue Necklace

I can make jewelry! Or rather, I can attempt jewelry. It has long been a goal of mine to start making jewelry. However, unlike sewing where I already have the machine and just have to buy fabric each project, or crafting where I already have a glue gun and just need some random supplies, jewelry making involves a whole new set of tools and materials - so I had to start from scratch. That's why I've been putting off jewelry-making for so long...but now I can make jewelry forever!

Over the course of a month or two, I collected Michael's coupons and purchased the supplies - wire, chains, necklace closures, straight pins, crimps..all kinds of things! I was planning to just use our wire cutters and pliers from the tool kit- but I discovered I really needed one of those round pliers. So I got one of those too, and it made all the difference!


After acquiring alllll of that, I finally got some beads as well. They're all cheap-y ones from Walmart right now, but once more coupons come in I'll probably get some prettier ones at Michael's again! I have so many jewelry ideas on my Pinterest board that I want to try, but I settled on the Cobalt Blue Cluster Necklace from My Girlish Whims to start. It looks pretty easy....boy was I wrong!


Okay it wasn't actually too bad. The hardest part (just like she mentions) is getting 50 or so beads on the straight pins and creating the loops. I was doing so terrible, but then I got those round pliers and it was way easier! Unfortunately, the holes in my (cheap) beads were too big for the pins, so I ended up hot gluing all the beads onto the pins...which may not hold forever, but I was determined to make do with what I had on hand!


After getting all the beads on pins (this only took me like...a month? I'm a slow worker :D), getting the chain and crimps and everything else was super easy. And I am very excited and pleased with this necklace! Now...what to work on next?! Maybe earrings to go with it!


Wednesday, August 7, 2013

Twix Brownies

One of my New Year's Resolutions this year was to make caramel. Sometimes I love to ponder on how my NYRs aren't so much resolutions...they're more like goals. Is there a difference? I should just say "one thing I'd like to change about myself is the frequency that I make caramel." Perfect! So now, instead of zero times per year, I have officially made caramel one time per year!

Instead of the usual boring (and amazingly delicious - Ghirardelli from Costco) brownies that I make, I wanted something fun when our friends came over. I have been eyeing these twix brownies from Jasey's Crazy Daisy for forever, and I finally got up the nerve to try them! I didn't have shortbread cookies, so I made a graham cracker crust instead and it was delicious. I should really make brownies with a graham cracker crust more often.


I also didn't have caramel squares...dun dun dun. And since I just can't make a single recipe without substitutions, I might as well admit that I don't ever buy cream anymore either, so I didn't even have that necessary caramel ingredient... :) So I found this caramel recipe from Bright Eyed Baker that uses milk! Making that caramel was certainly an adventure. Unlike her instructions that say it should take about a half hour...mine took well over that and still didn't get thick! I was stirring the sauce on the stove after adding the milk, and I realized my burner had turned off a while before...(it does that :( ) so I think I let it cool too much and it just never got thick!

Despite that (wow, sorry long post!), these brownies were seriously DELICIOUS. Make them! Make them with a million substitutions! Just look at the picture for ages and keep drooling! I definitely know we'll make these brownies again. I may even splurge and get caramel squares! Haha, actually I will for sure get caramel squares next time. They were gooey, rich, chocolatey and caramelly and amazing.

 
p.s. Sorry these pictures are so bad...we were eating them way too fast! Also, I'm trying to improve my food photography just a little bit, and clearly these pictures aren't doing it.

Saturday, July 27, 2013

The Most Adorable Fabric Ever

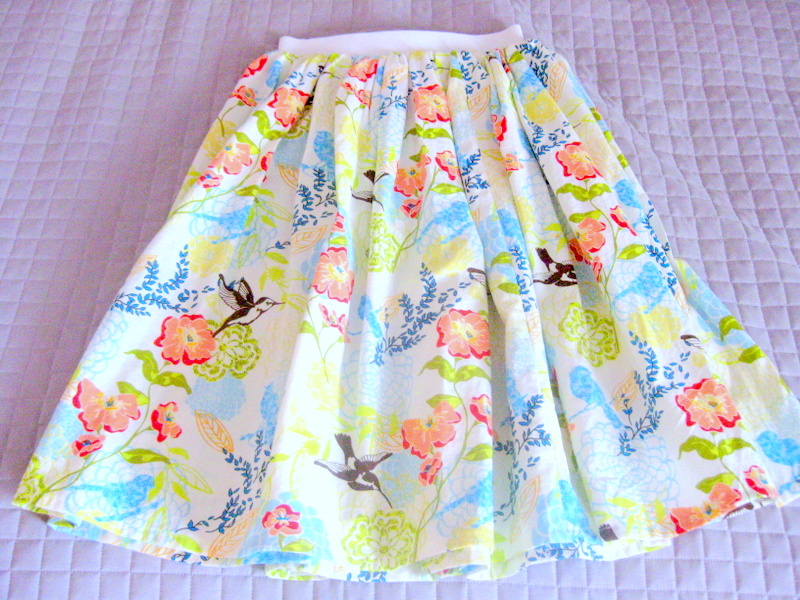
Every time I look at this fabric, I am still so in love with it! I bought it over a year ago, and I bought all that was left at JoAnn's! (I'm sure they have since restocked, many times.) Then it sat in my closet because it was just too gorgeous to do anything with. Everyone I asked mentioned pillows (not really our color scheme), or an apron (I have an adorable one from my mother!), and so I inevitably thought of a skirt, since I seem to make more of those than anything else.


I used this tutorial from Freshly Picked as my inspiration, but I kind of just winged it as well. I think it's truly the best use of this fabric. I used almost the entire amount - it's 3 times the circumference of my waist, and I love the giant and simple elastic on top. It was super simple to make - just cut, sew together, gather, and sew to elastic! I feel a little silly whenever I wear it just because it is so big and bright and full, but I really really love it at the same time and I think it's the best constructed skirt I've made yet! I tried to be so careful in my cutting and sewing, and it really paid off.

Tuesday, July 23, 2013

Bedroom Wall - Finally Bare No More!

I finally took the plunge and did something with the wall above our bed! I've been looking for some kind of headboard or wall art ever since we moved in, but I really didn't want to spend a ton of money. (Story of our lives!) After painting the striped canvases for our living room, I knew I didn't want to buy more canvases because they are quite pricey. When I stumbled upon this wall art using vinyl and moulding from Ooh Baby Designs, I knew it was meant to be on our wall! I feel like this is really my decorating style - simple.


I've always had trouble with vinyl decorations because I feel like they're so cheesy. I tend to dislike all the cliché sayings. But I really wanted this wall art, and so I found the most acceptable one at Bed Bath & Beyond and just went with it. I found these thin pieces of wood moulding at Michaels and painted them blue with leftover paint from our striped canvases. I can't believe I waited over a year for this 20-ish minute project!


I always read other bloggers' posts and think about how everyone is such a expert on the things they blog about. Will I ever be this way? Will I tell random stories about my life all while showing off gorgeous pictures of my food? Will I try out a million recipes and learn the chemistry behind baking just so I can create the perfect cookie recipe? The answer is...maybe? But for now at least, I still consider myself a very non-expert in everything on this blog. Case in point: How hard should it be to nail in 4 pieces of straight wood for a frame? And yet, there's a hole in my rectangle here. Next time, self, attach the 4 pieces into a triangle before nailing them to the wall! I guess for now I'll still be learning as I try out each new project on this blog. :)